Texturing the tunnel was when I began to understand more about how tri-planar projection works as well as more on customising the models using masks and materials. There weren’t many challenges I faced during texturing other than the dirt smart material would not load onto the model for an unknown reason, to get around this I decided to add a rust material and apply a ground dirt mask to it. I then changed the colour of the dirt to match the dirt from the footage I was using creating the effect I wanted.
One element of Substance Painter I wish I had realised sooner was that importing an object made up of several components, each with their own UV’s and material, would create their own layer to edit directly. This would have saved more time on my other models where I was masking out specific areas for textures instead of using these texture sets.
The Tunnel modelling I went into quite confident, As it was primarily basic shapes I was creating I was expecting more of the challenge to come from texturing. As I began modelling I quickly spotted time-savers such as duplicating my panels for the fence and stretching and reusing them for the door. It was a good learning experience to have a simple model to craft that allows as a refresher to what I’ve learned already.
The main challenge for this shot was the barbed wire, as I had no idea how I would go about creating it. I followed this tutorial here:
While this showed me the primary way of how to create a straight wire not the curled one I originally planned for, the 2014 version of Maya did not allow for the same method of following the curve when extruding. Online forums were no help, but I instead looked up a video on how to create rope in Maya for the 2016 version seen here:
The difference was instead of selecting the object, I had to select the faces individually, and then also select the curve itself while in face mode. After this, it was a simple case of following the rest of the tutorial for modelling the rest of the wire and adding the barbs. What I dislike about this method is the number of faces you end up with. This skyrockets into the hundred thousand extremely quickly especially for such a long piece of wire in my scene. It was potentially worth sacrificing the quality in order to have less slow down during modelling.
Finally, I decided that the fence was a little too boring being even, so I used the soft select feature to edit each edge to pull in slightly or be pull away from the centre as well as move some of the planks back and forth to make it look more poorly put together. Lastly I added a crack in one of the planks just to add to the poorly built effect.
This model looks almost exactly what I wanted to create from my concept art and should need a very small amount of refinement that I should potentially be able to do when compositing together in blender.
To create the object track for my grappling hook. I looked to create something that could be attached the wrist with tracking markers in the form of coloured balls. I started by looking at using a small piece of plastic guttering, as the cylindrical shape would be able to fit around my wrist and the plastic would hold anything I stuck to it. After going to BnQ to look for piping I realised that I would either have to get a several meter long pieces with no efficient way to cut it, leading to a potential cutting hazard. But the hole itself was too large for my arm so would need to have some padding fitted inside it. All the other pipework was too small for an arm to fit through comfortably so I decided that guttering would not be cost efficient or practical at all.
It was when I saw someone walking outside BnQ with a cast on their arm that I thought about wrist supports. A quick purchase on Amazon later and I had a wrist support ready to go.
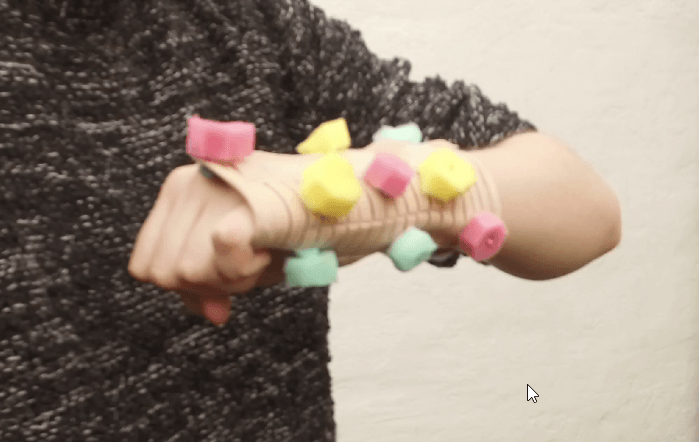
The next problem was how to add the tracking markers. I needed a way for them to be stable, as when I tested object tracking it was always good to have them stick out to give the object depth and a more reliable track. I originally wanted to use ping pong balls but I realised that the size of them would be larger than my model would cover. So after some experimentation, I cut up some coloured washing up sponges and used cocktail sticks to stick them in the wrist support. This basically became a homemade iron maiden for your wrist, so using more of the sponge to act a buffer on the inside, this had the added benefit of keeping the toothpicks stable so the tracking markers didn’t move around.
From my original tests, I found that my tracking markers didn’t contrast enough. And I should have used RGB instead of red, yellow and teal. To fix this I added black dots with a sharpie on everything. to allow key points for my markers to track. And this worked effectively enough for me to move onto my final track.
Here is a full playlist of all the footage I filmed to be tracked.
Backyard Longshots:
This footage was mostly unusable as I was stood too far away from the camera that the tracking markers couldn’t distinguish the dots on it my prop.
Indoor Shots:
This first of these is the shot I ended up using for my object track. the reason is due to the minimal arm movement and a clear vision of the markers on the prop. However, there was no way to track the background allowing me to only rely on the tracking data of the object for the camera.
Backyard Closeups:
The awkward camera angle and heavy movement of the arm made these untrackable. It was also after these shots I realised I needed more tracking markers on the prop itself to be more reliable to tack.
Tunnel Shots:
Exposure was a large problem here as due to poor UI design on the app, I could not find out how to lock the exposure. However, through editing these shot can have around 10 seconds without too much exposure change, allowing for a decent track. Due to the difficulty of getting to the location during poor weather, I was unable to reshoot.
Industrial Shots
Almost all of these shots are trackable due to the high amount of contrast on the ground and the wall. I chose the shot that had the shortest distance traveled and the least amount of motion to get the best track.